Getting Started
Gameplay
Lore/Story
Modding
Development
Community
Links
Getting Started
Gameplay
Lore/Story
Modding
Development
Community
Links
Writing an engaging mission requires dialog. The more interactive and high stakes the dialog, the more immersive the gameplay. Today, I'm going to take you step-by-step through how I plan, document, and write dialog trees to make it more engaging.
-Jazzy
You can't plan dialog for a mission that you haven't started yet. I'm going to invent a basic mission plot for the purposes of this example.
The ASC Horizons was on a critical mission to deliver an ambassador to peace talks with the Daichi. The newly minted captain of the Horizons wakes one morning to find that the ambassador has gone missing aboard his ship. Further investigation reveals that some of the crew was corrupt and helped pirates kidnap the ambassador so that they can ransom him back to the Alliance. Pirates hailed the ship and said that the Horizons needs to help them steal something from the Chintu traders in this system. Alliance Command has informed the Horizons that they need the Ambassador back and the diplomatic mission to continue at all costs. Either way, get the peace talks back on schedule. They don't care how you do it. The Pirates simply want the Horizons to go be a distraction while they steal the shiny thing.
So the Horizons enters the system and begins to speak with the Chintu. This is where our example comes in. Let's write the dialog tree between the Horizons and the Chintu.
Before you start plugging away at the Dialog editor in Designer, you want to plan out the dialog. Sure, you could do some of the simple ones in your head but it is much easier to draw out the more complex ones. I use Yarn Spinner but good old pen & paper work great too.
My goal of the conversation is to have options for:
I have three variables created: PirateWin, EvenMatchup, and DefendersWin.
Now is a great time to sketch this out. You need to identify…
The following image is the graphic I made in Yarn Spinner.
Ctrl + Click or Cmd + Click the image to open a larger version in a new tab so that you can follow along.
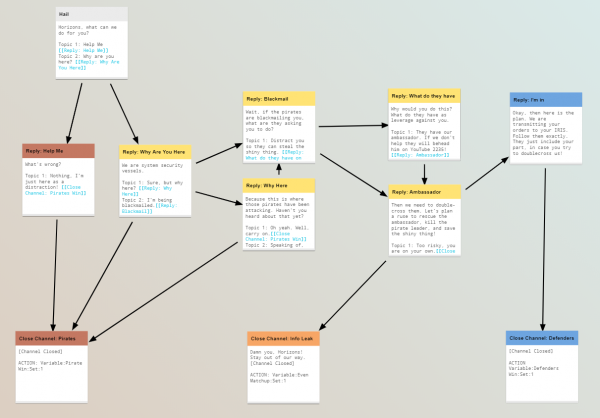
 Notice that each box is a new Dialog Group. I'm going to add these to the NPC's Object under Dialogs inside the Mission.
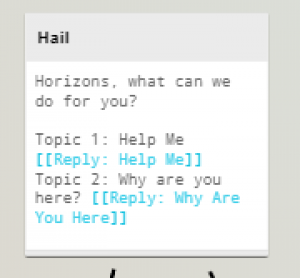
If you look at one of my boxes we can talk about how I organize my thoughts, so that you can follow along.
The box header has the name I'll use for the dialog group. This is what we link to when pointing our replies.
The text right below the header is the TEXT that the NPC sends to the Player.
“Topic 1:”, “Topic 2:”, etc are the options for Player replies to the NPC. Note that the blue double bracket text is used to draw the lines between the boxes in Yarn Spinner.
At the bottom of the box (not pictured here) I'll write “Action:” to mark any action that will be triggered when the NPC sends the text for this dialog group.
Now, take a moment to trace my dialog tree. See how you can just be bad, think about being good, try to be good, and actually be good. Depending on what you send, it will change one of the three variables to =1.
I'll write some events to check against the variables later in the mission. That way, there can be three forks in the story.
Okay, so now that you've done your homework, this part is now really easy. The best part about doing this on the computer is that now I can copy & paste the text from Yarn Spinner into the Designer.
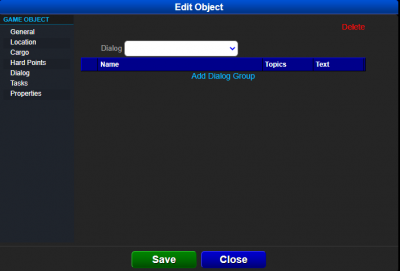
Now that you are ready to begin recording this info, you need to add a new Dialog Group. I make one of these for every reply from the NPC.
PRESS “ADD DIALOG GROUP”.
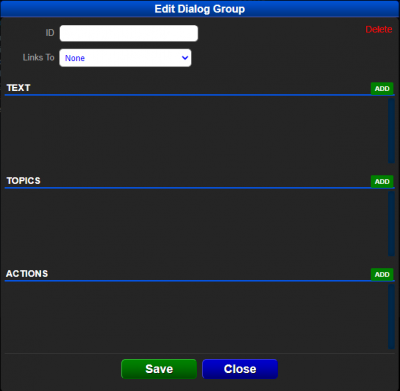
The ID is the “name” of the dialog group. It is also the ID that you reference when you map responses. We will look at that in a moment.
Links To selects the next Dialog Group that will automatically load after this one. This makes it easy to tell someone something and then load a Dialog Group that doesn't have any TEXT but has a bunch of TOPICS. This means you can write the topics one and then keep pointing back to them.
TEXT is what the NPC says to the player. If you add multiple TEXT entries in the same Dialog Group, the game will choose one of those at random when this Dialog Group is triggered. This helps keep things fresh.
TOPICS are the possible replies from the Player to this message. Each entry contains the name of the Topic (I tend to stick with the auto-generated ones with the numbers), the text of the TOPIC, and what selecting this topic will LINK TO. The LINK TO will point to the ID of the next dialog group.
ACTIONS are triggered when the NPC sends their TEXT or when the topics become available for the Player to send, if there is no TEXT assigned to this dialog group. These are the same actions that are used in the event system. Check out the actions page for more info about all of the options.
See all of my boxes? Yeah, make those too. Make sure that every topic has its LINK TO set to the correct thing. This goes super fast if it is all written out.
So you have written everything and you launched the mission. You try to hail this ship and you only get the generic dialog. What gives?!
The module-level has Dialog Trees too. These provide the basics. If you assign a Dialog Group ID to be Main, it will be the list of topics available to the Player whenever they are first hailing the ship.
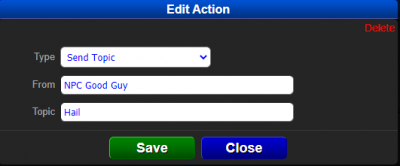
To send a custom topic, you can use the Send Topic action. Event Actions and Dialog Actions can trigger dialog topics. You simply type the name of the ship that is sending the message and the ID of their Dialog Group. Now, when the Action is triggered, it will cause the dialog to change. If the triggered Topic has TEXT, the NPC will message you. If it only has TOPICS, your options for hailing the ship will change to the new list.

Join our Discord Server so that we can help you!
Message @Jazzy#0858 for specifics on this Tutorial.
Dialog Tutorials | Creating a Sample Dialog Tree | Creating Custom Hailing Dialog | Back to Tutorials